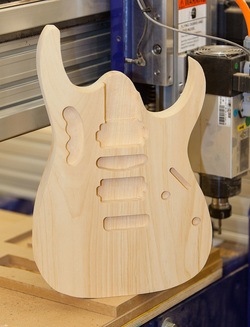
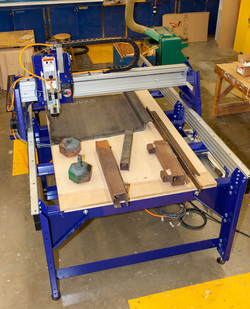
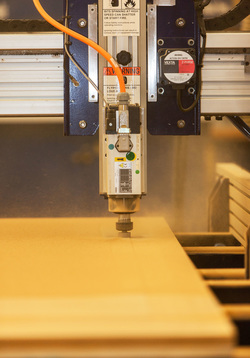
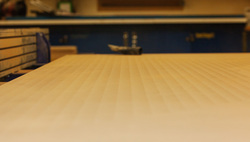
We have been slowly moving forward with our solid body guitar work on the CNC. A pine blank was glued up (much cheaper to learn on pine than a more expensive blank) which made it easier to mill and work on with hand tools. This is a first-build for the student making one of these so he can practice and shape it much easier in pine. You may notice that it looks like some of the CNC work should have gone completely through the blank?!? We didn't have a long enough bit to accomplish this yet but we will when it comes to the actual body. Along the way we have learned a ton about the importing of vectors, images, node editing, creation of tool paths not to mention making guitars. The nice thing is that once we have this particular design down it will always be available for use by other students.
Our next task on the CNC involves learning how to import images and trace vectors. The image to the right was a simple import of a bitmap and an automatic "bitmap tracing" of the images. We used Brazilian Cherry and as it turns out we would probably not use the same material for such a v-carving again. The wood tends to chip out in the more highly detailed areas and it's just so darn hard that it will eventually wreak havoc on our bits. We plan on using this CNC a LOT so the less we can spend on bits and sharpening the more we can spend on material. Now we are getting to the really cool stuff!One of our students is working on a solid body guitar right now. In the past we have simply template routed the outer shape and the recesses for the electronics. This worked out pretty well but there is always that nervous moment when you begin the process on an expensive body blank. You never really know just how the bit and router table are going to handle the material. So...we have decided to try and bitmap trace this template in VCarve Pro and let the CNC do all of the hard work. We are going to try our first one on a blank of glued up pine, mainly because it's cheap and soft. To the left is the photo we took of the front template. After running the bitmap trace we learned that if we light the template better we can reduce the shadows from the natural light and the flash. This will help a lot during the tracing process. Here is the first bitmap trace of the body template. It turned out pretty good but we are going to learn a lot about node editing in order to get this ready to generate the toolpaths. There are a bunch of bumps and irregular vectors that, when you zoom in on it, will definitely show up in the actual CNC work. We figure if we spend the time right now to get the drawing perfect, it should help to reduce issues later on in the machining process. Most of the issues came about from the shadows present in the original image. Better lighting please!!! We have begun to learn just how to run our new Shopbot CNC and this is one of the first projects we worked on. We cut a test version out in MDF then did this one with MDF with a hardwood veneer face. It will take some trial and error to get this type of signage just right but the students and I are finding that the machine and the associated Vectric design and toolpath software are both very user friendly. A couple of hours of video tutorials and you are on your way! Funny thing is that it takes much longer to paint the darn things than it does to design and cut them out. Now that we have the machine itself constructed, it is time to put the build surface together. We used a sheet of Baltic Birch ply for the base, bolted to the machine bed. Then it was all about rolling a ton of glue over the surface for a sheet of 3/4" MDF to stick to. We had a little difficulty in getting the MDF to align perfectly with the underlayment (actually, it didn't align up too well at all) but I guess we learned a few things at the least. We used our new composite nail gun from Raptor to secure the corners and then it was all about throwing some weight around. Thank you Mr. Leair for all of the scrap steel! We placed some heavy sheet goods on the MDF and then proceeded to carry a ton (literally) of scrap steel all over the bed to keep it flat while the glue dried. It worked for the most part but we did notice after the fact that there were a couple of places that the edges did not get glued down tight. Not to worry too awful much since we believed that the spoilboard surfacing should eliminate any issues. Yeah, I know. If we only had the dust collection hooked up before surfacing the spoilboard. We live in a fairly rural area of the state and getting your hands on 4" dust collection flex hose seems to require perfect planet alignment in concert with very specific dew points along with the presence of 3 young goats and a mangy old feral cat. Don't really understand that but...Anyway, the spoilboard is surfaced and we got all of the dust cleaned up. As you may be able to see from the image to the right, we do have some ridges from the surfacing. This means that the spindle is not perfectly square to the table. Truth be told, these ridges probably look worse than they actually are. You can barely feel them with a fingernail. Nice thing about the table being surfaced is that now you can get a square on it and really get the spindle perfectly aligned. The ridges are not significant enough to warrant a re-surfacing right now so we are finally ready to begin cutting some parts! After quite a few years of trying, we finally have our new CNC! Several of our students have taken time after school and on weekends to help get this machine up and running. The actual build was pretty straightforward with very few real issues. Shopbot tech support has been fantastic when we ran across issues. We all read through the assembly manual a couple of times before the machine showed up so we had a general idea what to expect. There's a lot of wiring!!! I was surprised just how well everything went together and the process of squaring everything up was easy and very accurate. A big thank you to our District Maintenence department and the electricians for getting us hooked up so quickly! Fit and finish is excellent and Shopbot seems to have gone the extra mile and painted it to match our school colors. Our metals manufacturing teacher next door, Mr. Leair, is jealous of that and already has plans to try and make his plasma torch look as good as this does. Good luck with that! |
AuthorAuthor work will vary within this blog. It may be the Teacher taking a moment to show off what the students have created but this is truly here for the students to express themselves! Archives
September 2017
Categories |